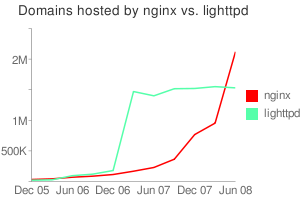
Nginx是一款性能非常强劲的Web服务器,也可以用来做反向代理服务器,现在用Nginx做服务器站点越来越多了。

上图是Nginx和Lighttpd的主机数量比较
最近我试用了一下Nginx,做了一个Nginx+Tomcat的测试,具体步骤如下:
groupadd www
useradd -g www www
wget ftp://ftp.csx.cam.ac.uk/pub/software/programming/pcre/pcre-7.8.tar.gz
wget http://sysoev.ru/nginx/nginx-0.7.39.tar.gz
tar zxvf pcre-7.8.tar.gz
cd pcre-7.8
./configure
make
make install
cd ..
tar zxvf nginx-0.7.39.tar.gz
cd nginx-0.7.39
./configure –user=www –group=www –prefix=/usr/local/nginx –with-http_stub_status_module –with-http_ssl_module
make
make install
cd /usr/local/nginx/conf/
我们编辑nginx.conf文件,内容如下
user www www;
worker_processes 3;
error_log logs/error.log notice;
pid logs/nginx.pid;
events {
use epoll;
worker_connections 1024;
}
http {
include mime.types;
default_type application/octet-stream;
include /usr/local/nginx/conf/proxy.conf;
log_format main ‘$remote_addr – $remote_user [$time_local] “$request” ‘
‘”$status” $body_bytes_sent “$http_referer” ‘
‘”$http_user_agent” “$http_x_forwarded_for”‘;
#access_log logs/access.log main;
sendfile on;
tcp_nopush on;
#keepalive_timeout 0;
keepalive_timeout 65;
#gzip on;
server {
listen 80;
server_name localhost;
#charset koi8-r;
access_log logs/localhost.access.log main;
#location / {
# root html;
# index index.html index.htm;
#}
location / {
proxy_pass http://localhost:8080;
}
#location ~ .*\.(gif|jpg|jpeg|png|bmp|swf)$ {
# expires 30d;
#}
#location ~ .*\.(js|css)?$ {
# expires 1h;
#}
location /NginxStatus {
stub_status on;
access_log on;
auth_basic “NginxStatus”;
}
#error_page 404 /404.html;
# redirect server error pages to the static page /50x.html
#
error_page 500 502 503 504 /50x.html;
location = /50x.html {
root html;
}
}
}
同时我们要在/usr/local/nginx/conf下创建proxy.conf文件,内容如下
proxy_redirect off;
proxy_set_header Host $host;
proxy_set_header X-Real-IP $remote_addr;
proxy_set_header X-Forwarded-For $proxy_add_x_forwarded_for;
client_max_body_size 10m;
client_body_buffer_size 128k;
proxy_connect_timeout 90;
proxy_send_timeout 90;
proxy_read_timeout 90;
proxy_buffers 32 4k;
保存之后,进入/usr/local/nginx/目录下,执行sbin/nginx,即可启动Nginx。
客户端浏览器输入http://ServerIP,可以看到Tomcat的欢迎页面,证明Ngnix已经转发HTTP请求给后端的Tomcat了,打开http://ServerIP/NginxStatus可以查看Nginx的状态,在Shell下我们还可以查看一下HTTP头
curl -I http://localhost
HTTP/1.1 200 OK
Server: nginx/0.7.39
Date: Thu, 05 Mar 2009 02:08:54 GMT
Content-Type: text/html;charset=ISO-8859-1
Connection: keep-alive
Content-Length: 8132
关于Nginx的配置,还是需要看它的文档http://wiki.nginx.org/Main,国内张宴的《Nginx 0.7.x + PHP 5.2.8(FastCGI)搭建胜过Apache十倍的Web服务器(第4版)[原创]》非常不错,可以参考。