标签: Nginx

Nginx下alias支持PHP的问题

这几天在配置Nginx,PHP用FastCGI,想装一个phpMyAdmin管理数据库,phpMyAdmin不想放在网站根目录下,这样不容易和网站应用混在一起,这样phpMyAdmin的目录就放在别处,在Apache里,有alias,比较方便,在Nginx下没有虚拟目录概念的,是用location配合alias使用,我先试了简单的配置方式

location /web/ {
alias  /data/web/;
index  index.html index.htm index.php;
}

location ~ .*\.(php|php5)?$ {
fastcgi_pass  127.0.0.1:9000;
fastcgi_index index.php;
include fcgi.conf;
}

我用http://localhost/web/可以访问到/data/web目录下的静态文件,但访问php文件,却报No input file specified.的错误,而且在Nginx的error日志上却什么信息也没有,我在网上搜索了一下,判断应该是php文件并没有被后端的FastCGI运行,我又继续搜索一些文章,试着增加了一段配置

location /web/ {
alias  /data/web/;
index  index.html index.htm index.php;
}

location ~ ^/web/.+\.php$ {
root /data/;
rewrite /web/(.*\.php?) /$1 break;
include fcgi.conf;
fastcgi_pass   127.0.0.1:9000;
fastcgi_index  index.php;
fastcgi_param SCRIPT_FILENAME /data/web$fastcgi_script_name;
}

location ~ .*\.(php|php5)?$ {
fastcgi_pass  127.0.0.1:9000;
fastcgi_index index.php;
include fcgi.conf;
}

这下可以了,原理应该是采用rewrite的方法,对于/web/下php类型的的请求交给后端的FastCGI处理,并且指定了php脚本的位置,这样我们就可以配置phpMyAdmin了,配置如下

location /phpmyadmin/ {
alias  /data/phpmyadmin/;
index  index.html index.htm index.php;
}

location ~ ^/phpmyadmin/.+\.php$ {
root /data/;
rewrite /phpmyadmin/(.*\.php?) /$1 break;
include fcgi.conf;
fastcgi_pass   127.0.0.1:9000;
fastcgi_index  index.php;
fastcgi_param SCRIPT_FILENAME /data/phpmyadmin$fastcgi_script_name;
}

location ~ .*\.(php|php5)?$ {
fastcgi_pass  127.0.0.1:9000;
fastcgi_index index.php;
include fcgi.conf;
}

要注意的是

location ~ .*\.(php|php5)?$ {
fastcgi_pass  127.0.0.1:9000;
fastcgi_index index.php;
include fcgi.conf;
}

这段,要放在phpmyadmin的后面,放在前面就有问题,这是和Nginx的location规则有关,具体看Nginx的文档,另外,phpMyAdmin里要配置一下URI的绝对路径,就可以了。
LVS和Nginx的一些杂记

LVS(Linux Virtual Server)是章文嵩博士创立的开源项目,可以帮助我们建立高可用性和高扩展性的Linux集群,LVS性能非常好,在暂时不能花费巨资购买F5、NetDispatcher之类硬件的时期,LVS还是能够很好的满足需要的。

LVS的Linux组件IPVS在新版本的Linux内核里已经支持,不需要单独再安装,可以通过命令

lsmod |grep ip_vs

检查内核是否支持IPVS。

ipvsadm是LVS的管理软件,在编译安装的时候要注意,先做一个ln连接,类似

ln -s /usr/src/kernels/2.6.9-42.EL-smp-i686 /usr/src/linux

ln -s /usr/src/kernels/2.6.18-8.el5-x86_64 /usr/src/linux

keepalived是一个很方便的LVS管理工具,只要需要配置keepalived的配置文件就可以了,不用一条一条的执行ipvsadm命令了。

将keepalived加为服务的方法(keepalived默认安装在/usr/local/etc下)

cp /usr/local/etc/rc.d/init.d/keepalived /etc/rc.d/init.d/
cp /usr/local/etc/sysconfig/keepalived /etc/sysconfig/
mkdir /etc/keepalived
cp /usr/local/etc/keepalived/keepalived.conf /etc/keepalived/
cp /usr/local/sbin/keepalived /usr/sbin/

关于虚拟IP与真实服务器IP的端口对应问题
在测试中,发现虚拟IP的端口只能和真实服务器IP的端口对应,比如虚拟IP的端口是80,后面对应的真实服务器的端口也只能是80,不能任意配置,真实服务器的端口,让我非常的不解,是我配置错误?还是LVS或keepalived得问题呢?

在Nginx服务器里也可以实现简单的Load Balance,举例

upstream tomcats {
ip_hash;
server 127.0.0.1:8080 max_fails=3 fail_timeout=30s;
server 127.0.0.1:8280 max_fails=3 fail_timeout=30s;
}
server {
location / {
proxy_pass http://tomcats;
}
}

其中,ip_hash的作用在于很据用IP做hash算法,分配到相应的后端服务上,这样的话,用可以基本上固定的分配到某台机子上,就不用担心Session的问题,fail_timeout和max_fails是指在单位时间重试的次数,如果连接不成功,则不会再向其转发请求。

试用Nginx

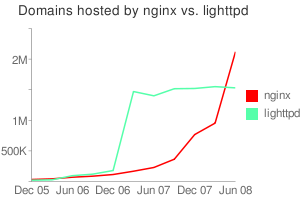
Nginx是一款性能非常强劲的Web服务器,也可以用来做反向代理服务器,现在用Nginx做服务器站点越来越多了。

netcraft_chart_with_lighttpd

上图是Nginx和Lighttpd的主机数量比较

最近我试用了一下Nginx,做了一个Nginx+Tomcat的测试,具体步骤如下:

groupadd www
useradd -g www www

wget ftp://ftp.csx.cam.ac.uk/pub/software/programming/pcre/pcre-7.8.tar.gz
wget http://sysoev.ru/nginx/nginx-0.7.39.tar.gz

tar zxvf pcre-7.8.tar.gz
cd pcre-7.8
./configure
make
make install
cd ..

tar zxvf nginx-0.7.39.tar.gz
cd nginx-0.7.39
./configure –user=www –group=www –prefix=/usr/local/nginx –with-http_stub_status_module –with-http_ssl_module
make
make install

cd /usr/local/nginx/conf/

我们编辑nginx.conf文件,内容如下

user  www www;
worker_processes  3;

error_log  logs/error.log  notice;

pid        logs/nginx.pid;

events {
use epoll;
worker_connections  1024;
}

http {
include       mime.types;
default_type  application/octet-stream;

include    /usr/local/nginx/conf/proxy.conf;

log_format  main  ‘$remote_addr – $remote_user [$time_local] “$request” ‘
‘”$status” $body_bytes_sent “$http_referer” ‘
‘”$http_user_agent” “$http_x_forwarded_for”‘;

#access_log  logs/access.log  main;

sendfile        on;
tcp_nopush     on;

#keepalive_timeout  0;
keepalive_timeout  65;

#gzip  on;

server {
listen       80;
server_name  localhost;

#charset koi8-r;

access_log  logs/localhost.access.log  main;

#location / {
#    root   html;
#    index  index.html index.htm;
#}

location / {
proxy_pass http://localhost:8080;
}

#location ~ .*\.(gif|jpg|jpeg|png|bmp|swf)$ {
#    expires      30d;
#}

#location ~ .*\.(js|css)?$ {
#   expires      1h;
#}

location /NginxStatus {
stub_status             on;
access_log              on;
auth_basic              “NginxStatus”;
}

#error_page  404              /404.html;

# redirect server error pages to the static page /50x.html
#
error_page   500 502 503 504  /50x.html;
location = /50x.html {
root   html;
}

}

}

同时我们要在/usr/local/nginx/conf下创建proxy.conf文件,内容如下

proxy_redirect off;
proxy_set_header Host $host;
proxy_set_header X-Real-IP $remote_addr;
proxy_set_header X-Forwarded-For $proxy_add_x_forwarded_for;
client_max_body_size 10m;
client_body_buffer_size 128k;
proxy_connect_timeout 90;
proxy_send_timeout 90;
proxy_read_timeout 90;
proxy_buffers 32 4k;

保存之后,进入/usr/local/nginx/目录下,执行sbin/nginx,即可启动Nginx。

客户端浏览器输入http://ServerIP,可以看到Tomcat的欢迎页面,证明Ngnix已经转发HTTP请求给后端的Tomcat了,打开http://ServerIP/NginxStatus可以查看Nginx的状态,在Shell下我们还可以查看一下HTTP头

curl -I http://localhost
HTTP/1.1 200 OK
Server: nginx/0.7.39
Date: Thu, 05 Mar 2009 02:08:54 GMT
Content-Type: text/html;charset=ISO-8859-1
Connection: keep-alive
Content-Length: 8132

关于Nginx的配置,还是需要看它的文档http://wiki.nginx.org/Main,国内张宴的《Nginx 0.7.x + PHP 5.2.8(FastCGI)搭建胜过Apache十倍的Web服务器(第4版)[原创]》非常不错,可以参考。